How do Organizations/Employers & Parents/Guardians Approve Hours?

Organizations/Employers & Parents/Guardians can approve or decline student hours via email by following these simple steps:

#1. Organizations/Employers & Parents/Guardians will receive an email message regarding student hours

#2. Click the   button in the email

#3. Review the information the student shared, and click  or 

That’s all! You’re done 🙂

For more information regarding the process, please see details below:

1. When a student submits their hours for approval, the organization/employer will receive an email from Hour Republic.

  • The email comes from Hour Republic (noreply@hourrepublic.com)
  • The subject of the email is: Please verify hours for [name of student]
  • Placement (co-op) hours are typically submitted weekly

2. Open the email, scroll to the bottom, then click on  to approve or decline the hours

3. You will be taken to a screen where you will have a chance to review the hours and submit a comment (optional)

4. Once you are finished reviewing the hours, you may select  or

5. A verification message will appear as follows:
Thank you. The status of these hours has been updated. Have a great day!

TIPS

If the student has sent out hours for approval and the organization has not received the email, then here a couple of possible reasons why:

1. The email may have been sent to your Spam folder.

2. The student may have input the email address incorrectly; double check with the student to ensure the email address is accurate.

Why isn’t an organization/employer or parent/guardian receiving my email for the verification of hours?

Here is a more detailed FAQ on a similar topic.

Are organizations/employers and parents/guardians required to create an account?

No, employers and parent/guardians are not required to create an account.

Students have an account where they add hours and you will receive an email that summarizes those hours and you can accept or decline the student’s hours with the option to leave a comment.

Click here to view the organization/employer fact sheet, which teachers can share with any supervisors. (Click here for the French version).

Why isn’t an Employer or Parent/Guardian receiving my email to verify hours?

If a Organization/Employer or Parent/Guardian is not receiving hour logs, then please review the following possible reasons:

  • The contact’s email was entered incorrectly
    If the contact’s email has been inputted incorrectly (e.g. spelling errors), then the student’s submission will not go through. Please ensure that students are submitting their logs to the correct email address.

NOTE: You can confirm a contact’s email by reviewing a student’s hour logs to see which email address has been recorded.

  • Verification emails have not been received by a contact or organization    Emails may not be received by the contact or organization as a result of their inbox being full or their email server being down. To check if this is the case, email the organization directly. If they are experiencing issues with their email, please call the organization to let them know.
  • Verification emails have been sent to the spam or junk folders 
    Emails from “noreply@charityrepublic.com” may be directed to spam or junk folders depending on the email firewall in use by a contact or organization. Please ask the contact to check their Spam and/or Junk folders and to add “noreply@charityrepublic.com” to a Safe List. They can also search their Inbox, searching “Hour Republic”, to locate the email message.

If the organizations needs assistance checking their spam folder or adding our email to their safe list, please send them this FAQ.

If none of the above reasons apply, then there are alternate ways to verify hours:

  • Share a direct link of the hour log with an Organization/Employer or Parent/Guardian
    Teachers can share a direct link with an Organization/Employer (or with Parents/Guardians specifically as it relates to volunteer hours) to verify  hours. Simply click on the “Copy hour verification link” and paste that link into any message. That will take an employer directly to an hour summary web page where they can verify hours. This is a helpful alternative when employers have not received an hour submission via email. Or, when you need someone else to verify an hour log (e.g. supervisor who is covering off for a colleague).
  • Re-send the email to a Company or Contact   
    If the company has not verified the hours after a long period of time, then please have the student edit their pending hours and click   to resend the verification email to the company or contact.
  • Teachers can “Save and Approve” the Hours       
    If a student cannot contact their organization and their hours are not being verified, guidance can manually save and approve of a student’s hours without verification from the organization.

Draft Email to Employer

I understand that you are not receiving verification emails from Hour Republic.

Sometimes, emails from Hour Republic (noreply@charityrepublic.com) may be directed to your Spam or Junk folders depending on the email firewall in use by your organization. Please check your Spam and/or Junk folders to locate the message.

If you are still unable to locate the email message, then please search your Inbox,  searching for “Hour Republic”, to locate the message.

Finally, you can add “noreply@charityrepublic.com” to a Safe List. This can usually be done directly in your email account, or via your IT department.

How do I add Hour Republic to my phone’s home screen?

If you would like to be able to quickly access Hour Republic from your phone’s home screen, then please follow these steps:

IOS

1. Click on the Safari app

2. Go to Hour Republic’s website

3. Locate and click on the  icon at the bottom of the screen.

4. Select the option to Add to Home Screen.

5. Enter the name of the shortcut (e.g. HR) then click Add. Now you should be able to access Hour Republic from your home screen

Android

1. Click on the Google Chrome app

2. Go to Hour Republic’s website

3. Click on the  icon in the top right corner.

4. Select the Add to Home Screen option

5. Enter the name of the shortcut (e.g. HR) then click Add. Now you should be able to access Hour Republic from your home screen


How do I Track Overnight Shifts?

If you work overnight shifts and have any questions about how to set up the shifts in Hour Republic, then is FAQ is for you:
1. Go to your  section
2. Click on in the top right corner
3. Fill in the necessary information such as employer/organization, skills learned, and the description
4. Now, scroll down the list of weekdays and click on the  icon next to the first day of your overnight shift
5. Set the start time for your shift to whenever you started your shift and the end time to 11:59 pm
6. Next, add a shift to the day after the first shift. Set the start time for the shift to 12 am and the end time to the end of your shift.
7. Fill in the rest of the information then either click  or 
TIP
If you have any questions about adding more than one shift, please see this FAQ

How Do Students Add Placement/Co-op Hours?

  1. Students can start to add hours by selecting the  icon on the left toolbar
  2. To begin, select the button in the top right corner of the page
  3. Students have the option to Label their hours (e.g. Week 1)
  4. Change the Category to Placement/Co-op under the Category type, then the hours will automatically change the Hour Type to a weekly block
  5. Next, add your Organization/Employer. Click the icon to add your employer’s information.
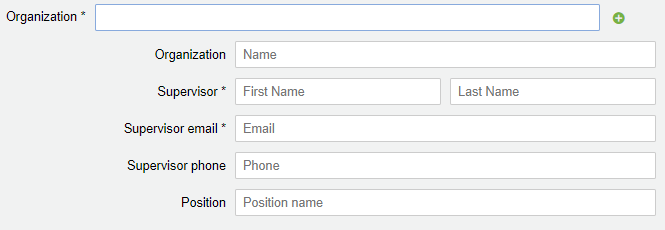
  6. Please fill out the Organization Name, Supervisor Name, Email, Phone Number, and their Position (e.g. Cashier)
  7. Under Skills Learned, you must add at least one new skill that you learned during your placement each week (e.g. Customer Service, Oral Communication)
  8. Please add a Description of what you did during your work hours (i.e. I learned how to use the cash register, I worked on filing papers)
  9. The week will automatically begin on the Monday of the current week and each day  will be listed for you to begin adding shifts
  10. To add a new shift, simply click the + symbol beside the days you worked
  11. The hours will automatically be set to Placement (Unpaid), however, you can also track Placement (Paid), In-School/Integration, Pre-Placement, and Dual Credit hours
    – If you take a Lunch/Break this will deduct minutes from the overall hours
    -If you were Absent or Late, please select the boxes to mark your attendance
  1. You can also add two shifts for one day by selecting the + symbol twice
  2. Once you have added and reviewed your hours for the week, you can select either  button to Save the hours as a draft, or Save and Submit to send to your Employer.
  • When clicking, the hours are submitted to the placement supervisor and become “Pending” hours
Tips
  • When students select “Placement” for the first time from the drop-down menu while adding hours, Placement becomes their new default hour type.


How do students copy a log?

Students can create a copy of their hours by clicking  at the right side of the desired hours:

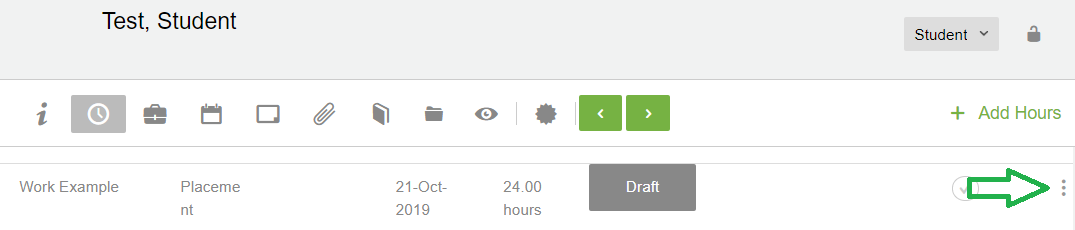
This will allow students to select Copy which creates an identical Draft of their hours.

If students have consistent hours each week (e.g. 9:00am to 12:00pm), then they can add hours and save those hours as a template. They can leave the template in Draft status and copy that template each week and even add a personalized Label (e.g. “template”).

How do Students Create an Achievement?

Students can create an achievement by following these steps:

1. Click on the Profile tab on the left side of the screen.

2. Next, select the  icon located at the center of the screen.

3. Click on the icon at the top right of the screen to add a new achievement.

4. Fill in all the necessary fields for the achievement. You can fill in additional fields such as the issuer and add an attachment by selecting the appropriate tab on the sidebar.

5. Once you have filled in all the information, click .

TIPS

1. You can delete unwanted achievements by clicking on them while on the Achievement page then selecting the  button.

2. Teachers/coordinators can add achievements in bulk. For more information regarding this feature, please click here

How does a Student Add More than One Shift?

If a student has multiple shifts in one day, here is how they can add those shifts to their weekly log:

1.While adding hours in a Weekly format, click on the  icon twice next to the desired day (e.g. Monday).

2. An additional shift should appear. You can keep adding more shifts by clicking the icon.

3. If you have accidentally added a shift, you can select the  icon next to the desired shift to remove it.

Note:

This guide only applies to the Weekly Hour Type


What if a Student has Two Employers/Supervisors?

If a student has multiple employers/supervisors, they can switch between them while recording their hours by following these steps:

1. Go to the  tab on the left sidebar.

2. Click on thebutton in the top right.

3. In the Organization field, start typing the name of the organization you are placed with and that organization’s name should pop up. Click on it.

Note:

If you have yet to add your organization, click on the  icon to add a new organization.

4. The Contact drop-down menu should now appear underneath the Organization field. This will allow you to choose between employers/supervisors.

5. If you need to add an employer/supervisor, click on the  next to the Contact drop-down menu and fill in all of the necessary information.


Exporting summary and weekly reports of hours

How do students print one hour log?

In the Hours section, students can export one entry of their hours by clicking at the right side of the desired hours. Select Export to create a PDF summary of hours and print.


How do students print a summary of all of their hours?

In the Hours section, students can export a summary report of their hours by clicking the Export iconbelow their progress bar.


Pre-Placement Activities for Students

A. Career Interests

Students can specify their career interests by following these steps:

1. Click on the tab to Edit your Student Profile (left-panel) or click on beside the hour tracking icon under your student profile

2. Click on the tab called Career Interests (left-side of student profile)

3. You can scroll through the Career Interests page and click on items that interest you. These interests will appear at the top of the Career Interests section after you click on them.

4. If you have additional interests that are not listed, then you can type them into the Other Interests field and click enter.

5. Once you’ve added all your interests, click thebutton.

NOTE:

1. Teachers/Coordinators can run a report on student’s career interests by clicking on the Reports tab.

2. Once on the Reports page, scroll down until the Interests report is located.

3. Click the report, set up the filters, then select Generate Report.

A. Availability

Students can add the times that they are available and unavailable by following these steps:

1. Click on the tab to Edit your Student Profile.

2. Among the series of icons along the top, click on the Availabilityicon.

3. Select thein the top right corner.

4. Once on the Availability page, fill in the Date Range and specify whether you are available or unavailable during this time.

5. You can also click the Timeslots tab on the left to specify which times you’re available during the week.

6. Once finished, click the  button.

NOTE:

1. Teachers/Coordinators can run a report on student availability by clicking on the Reports tab.

2. Once on the Reports page, scroll down until the Availability report is located.

A. Employers

Students can add organizations following these steps:

1. Click on the Hours tab.

2. Selectin the top right corner.

3. Click the next to the Organization field or, search the Organization field (the employer may have already been added by a teacher/coordinator or previous student).

4. Fill in all the necessary fields for your employer.

5. Once you filled in the necessary information, click on  in the top right corner.