How do I add expectations to learning plans?

Select the student learning plan and scroll to the bottom of the learning plan.

1. Click the Choose Expectations button  (under Course Expectations or Employer Expectations groups at the bottom of your plan)

2. From the pop-up menu, select the relevant tab (e.g. Curriculum) and “Choose” from the drop-down:

(i) Course Expectations
– All Curriculum
– Overall Course Favourites

(ii) Employer Expectations
– Occupations (NOC)
– Trades

3. Select the relevant expectation(s) by clicking on the expectation (e.g. A1.2 in the screenshot below)

When you click on an expectation, it will be included in the learning plan and a check mark will appear under the Selected column to indicate this (outlined in green above).

Once you are done selecting expectations, click the Done button and you will see the expectation included.

4. Save the learning plan or Save and Export

RELATED QUESTIONS

What if my expectation is not listed?

(i) You can insert your own expectation by clicking


How do I copy or re-use an existing form or learning plan?

Copying forms or learning plans allows you to use pre-existing forms rather than creating each form or learning plan from scratch.

We recommend starting with one student and using that student as the model student for OYAP and WEA forms for instance (e.g. for the WEA, copying fields like insurance coverage, placement dates, and schedule from one student to another). For learning plans, the copy feature allows you to copy learning goals, course expectations, employer expectations, etc. from one student to another.

*You can use the copy feature even if a student has a completely different employer and/or course.

#1: Click on the Forms tab in Hour Republic

#2: Select an already created form that you would like to copy from, then click the Copy icon  that appears at the top of the screen

#3: A separate page will pop-up and allow you to select all the students you would like to copy the form for

#4: Click Copy Forms

NOTES:
  • The form will auto-fill with relevant student information and all other field will copy over (e.g. Placement Start and End Dates).
  • If you are creating an OYAP form, you will need to check off the Registrant box at the top of the form in order to auto-fill section 2 (Registrant) of the form.

Exporting and printing forms and learning plans

In terms of exporting and printing documents, a teacher can:

  • Export and print individual forms for one student (e.g. one WEA, one learning plan);
  • Export and print all forms for a particular student (e.g. a student’s WEA, OYAP, and SCELP);
  • Export and print more than one form or learning plan for their class (e.g. all OYAP forms).

Once exported, the forms are collated into one PDF document, then teachers can print the document.

Export and print forms for one student
(e.g. one WEA, one SCELP)

There are several options to export individual forms and learning plans:

1. When a form or learning plan document is open, click Save and Export (either at the top or bottom of the form)

2. In the main Form section, under Recent Forms, select all or a specific form and type the students name in the search bar. Select one or all the recent forms you want, then click Export Forms

Export and print the same form (e.g. WEA) for multiple students

  1.  In the main Form section, under Recent Forms, select all or a specific form and select all the students you want included, then click Export Forms

Document e-signatures: How do form recipients (students, employers parents/guardians) provide e-signatures?

Teachers can send Employers, Parent/Guardians and Students (the “signee”) email requests to sign documents electronically.

#1. The signee will receive an email requesting an e-signature. The message will include the student’s name and the name of the document.

#2. The signee will click the Review & Sign button in the email message.

#3. A separate tab will open where the signee can review the entire form, e-sign and include their First Name, Last Name, and Email address. The signee will also agree to the terms for e-signatures.

#4. Once the form has been signed, the signee has the option to either download  a PDF version of the form or print  a copy of the form.

TIP: The signee can return to Review a form several times. Each time, if any new updates have been made to the form (e.g. by a teacher), those changes will appear. The signee can download or print the form multiple times.

NOTE:

➡️ On mobile devices, if the entire document isn't visible, an Open button or an arrow icon will appear. Tapping either will allow the user to view the full document.


How Does Guidance Approve Volunteer Hours?

If you would like to quickly locate your students’ unapproved hours, then please follow these steps:

  1.  Locate the sidebar on the left panel, then click on the Students tab.
  2. Set the filters to the following:
    Category > Volunteer
    Status > Verified
    All Hours > Unapproved
  3. Select a student that needs hours approved
  4. Review the students Verified hours and Select Save and Approve
  5. Guidance counselors can also click the check mark  under the Approve/Reviewed column to approve hours
  6. Once the check mark has turned yellow, the hours have been approved

How do I prevent students from adding Employers, Positions, and Contacts for hour tracking?

How to Activate the Feature

1. Click on the Main Administrative tab by clicking on your high school’s name.

2. Click on the Settings tab.

3. There will be an option titled Employer Setting. Check off this box.

4. Select .

How do Students Select Employers?

1. First, teachers will need to add all of the students’ employers. This can be done by following the steps in this FAQ.

2. Now, when students add hours, they can find their employer by typing the first few letters of their employer’s name into the Organization field and selecting that employer.

How do Employers and Parents/Guardians add our Email to a Safe List and Check Their Spam/Junk Folders?

Checking Spam/Junk Folders

When Using Gmail

1. Go to your Gmail account.

2. Along the left side of the page is a list of labels. If you keep scrolling you will reach an option that says More. Click on it to reveal more labels.

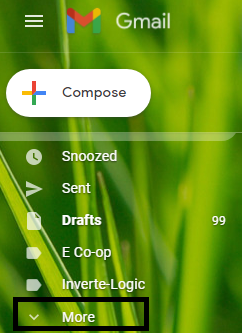
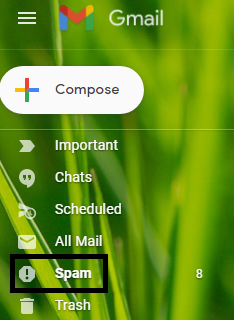
3. Once you click More, scroll down until you find the Spam label, click on it.

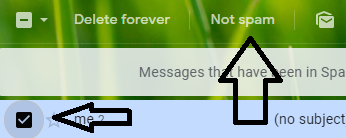
4. Check the box next to the Hour Verification email, then select Not Spam.

When Using Hotmail/Outlook

1. Go to your Hotmail/Outlook account.

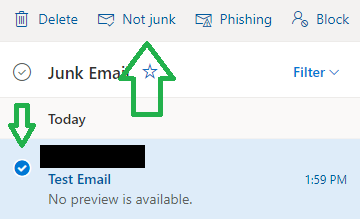
2. Along the left side of the page is a list of labels, click Junk Email.

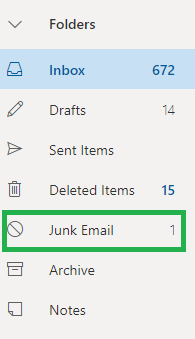
3. Check the box next to the Hour Verification email, then select Not Junk.

If the email was not there, please follow the steps below to add our email to your safelist and request the student to submit the hour verification.

Adding an our Email to your Safe List

If you cannot locate the hour verification email in your spam/junk folder, then please see the steps below regarding how to add our email to a Safe List in Gmail and Hotmail/Outlook.

When using Gmail

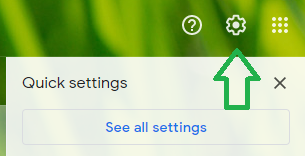
#1. Click on the gear icon in the top-right corner. Once the menu pops up, select See all settings

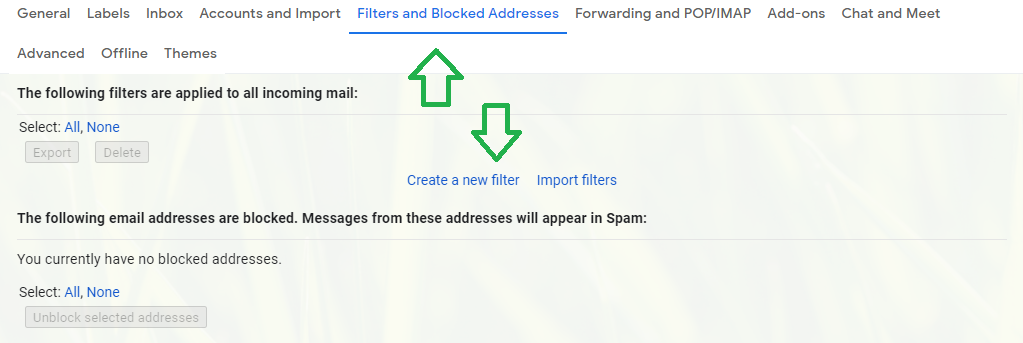
#2. Go to the Filters and Blocked Addresses tab and click Create a new filter

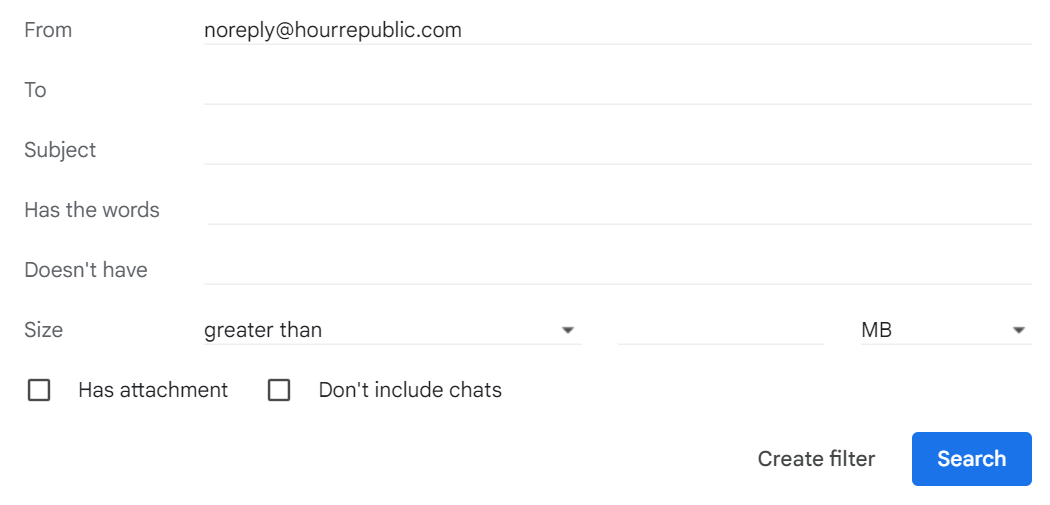
#3. Enter noreply@hourrepublic.com into the From field then click Create Filter

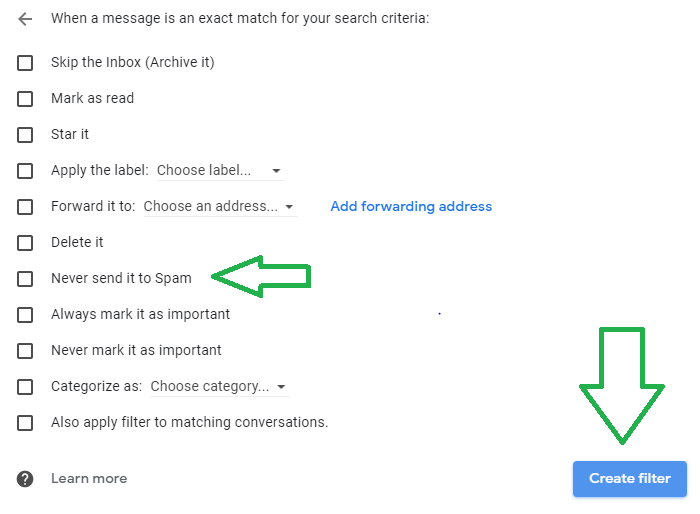
#4. A menu will pop-up, select Never Send it to Spam then click Create Filter

5. If the email was being blocked, request that the student resends the hour verification email to you.

When using Hotmail / Outlook

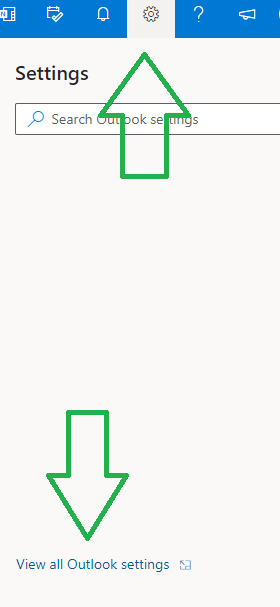
#1. Click on the gear icon in the top-right corner and then click View all Outlook settings

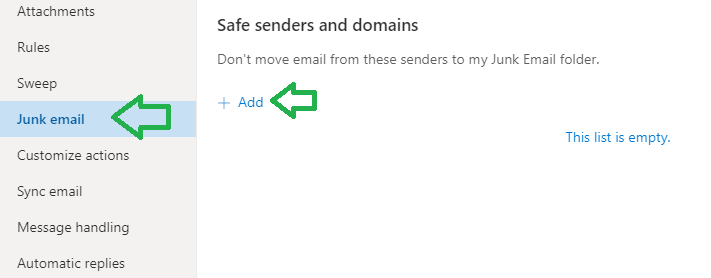
#2. Click on the Junk email tab then scroll down to the Safe senders and Domains section to select Add

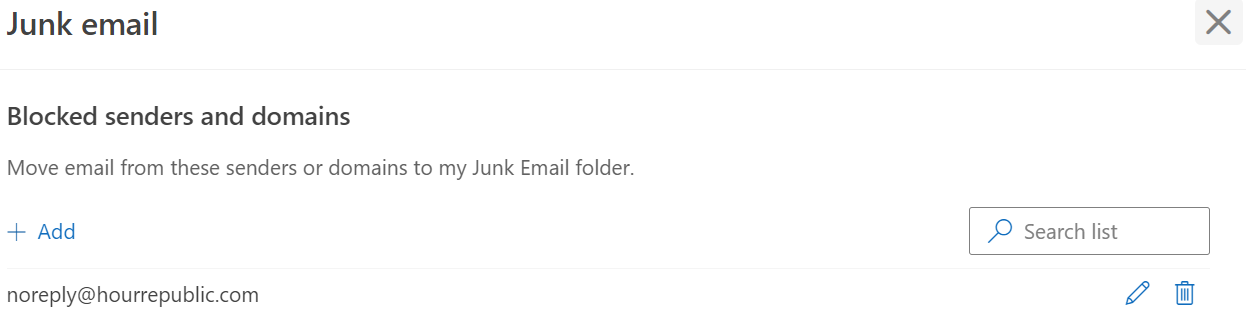
#3. Type in noreply@hourrepublic.com, press the enter key, and then Save your changes

4. If the email was being blocked, request that the student resends the hour verification email to you.

Alternative: Teachers/Coordinators can share a direct link to an hour log with an Organization/Employer or Parent/Guardian
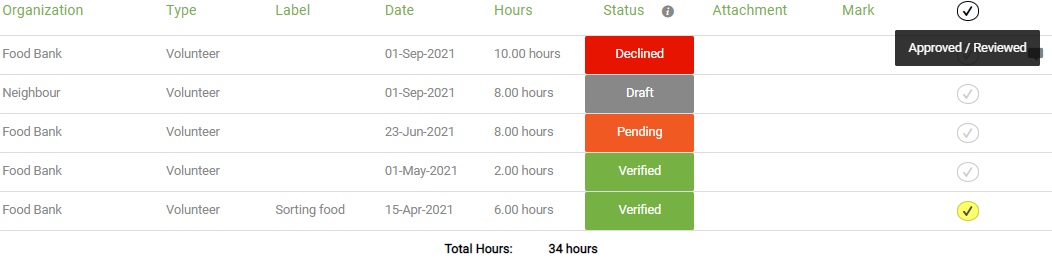
Teachers can share a direct link with an Organization/Employer (or with Parents/Guardians specifically as it relates to volunteer hours) to verify  hours. Simply click on the "Copy hour verification link" and paste that link into any message. That will take an employer directly to an hour summary web page where they can verify hours. This is a helpful alternative when employers have not received an hour submission via email. Or, when you need someone else to verify an hour log (e.g. supervisor who is covering off for a colleague).

How do I add Hour Republic to my phone’s home screen?

If you would like to be able to quickly access Hour Republic from your phone’s home screen, then please follow these steps:

IOS

1. Click on the Safari app

2. Go to Hour Republic’s website

3. Locate and click on the  icon at the bottom of the screen.

4. Select the option to Add to Home Screen.

5. Enter the name of the shortcut (e.g. HR) then click Add. Now you should be able to access Hour Republic from your home screen

Android

1. Click on the Google Chrome app

2. Go to Hour Republic’s website

3. Click on the  icon in the top right corner.

4. Select the Add to Home Screen option

5. Enter the name of the shortcut (e.g. HR) then click Add. Now you should be able to access Hour Republic from your home screen


How do Teachers/Coordinators Create an Achievement?

Teachers/Coordinators can create an achievement by following these steps:

1. Locate the sidebar on the left panel, then click on the Students tab.

2. Click on any student.

3. Next, select the  icon located at the center of the screen.

4. Click on the icon at the top right of the screen to add a new achievement.

5. Fill in all the necessary fields for the achievement. You can fill in additional fields such as the issuer and add an attachment by selecting the appropriate tab on the sidebar.

6. Once you have filled in all the information, click .

TIPS

1. You can delete unwanted achievements by clicking on them while on the Achievement page then selecting the  button.

2. Teachers/coordinators can add achievements in bulk. For more information regarding this feature, please click here

How do I Track Overnight Shifts?

If you work overnight shifts and have any questions about how to set up the shifts in Hour Republic, then is FAQ is for you:
1. Go to your  section
2. Click on in the top right corner
3. Fill in the necessary information such as employer/organization, skills learned, and the description
4. Now, scroll down the list of weekdays and click on the  icon next to the first day of your overnight shift
5. Set the start time for your shift to whenever you started your shift and the end time to 11:59 pm
6. Next, add a shift to the day after the first shift. Set the start time for the shift to 12 am and the end time to the end of your shift.
7. Fill in the rest of the information then either click  or 
TIP
If you have any questions about adding more than one shift, please see this FAQ