Pre-Placement Activities for Students

A. Career Interests

Students can specify their career interests by following these steps:

1. Click on the tab to Edit your Student Profile (left-panel) or click on beside the hour tracking icon under your student profile

2. Click on the tab called Career Interests (left-side of student profile)

3. You can scroll through the Career Interests page and click on items that interest you. These interests will appear at the top of the Career Interests section after you click on them.

4. If you have additional interests that are not listed, then you can type them into the Other Interests field and click enter.

5. Once you’ve added all your interests, click thebutton.

NOTE:

1. Teachers/Coordinators can run a report on student’s career interests by clicking on the Reports tab.

2. Once on the Reports page, scroll down until the Interests report is located.

3. Click the report, set up the filters, then select Generate Report.

A. Availability

Students can add the times that they are available and unavailable by following these steps:

1. Click on the tab to Edit your Student Profile.

2. Among the series of icons along the top, click on the Availabilityicon.

3. Select thein the top right corner.

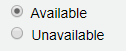
4. Once on the Availability page, fill in the Date Range and specify whether you are available or unavailable during this time.

5. You can also click the Timeslots tab on the left to specify which times you’re available during the week.

6. Once finished, click the  button.

NOTE:

1. Teachers/Coordinators can run a report on student availability by clicking on the Reports tab.

2. Once on the Reports page, scroll down until the Availability report is located.

A. Employers

Students can add organizations following these steps:

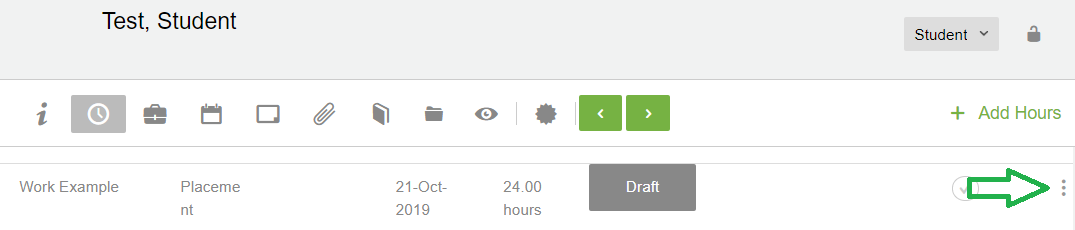
1. Click on the Hours tab.

2. Selectin the top right corner.

3. Click the next to the Organization field or, search the Organization field (the employer may have already been added by a teacher/coordinator or previous student).

4. Fill in all the necessary fields for your employer.

5. Once you filled in the necessary information, click on  in the top right corner.

Disable/Enable sections and fields

If there are specific fields or sections that you would like to disable or hide, then please follow the instructions below.

1. Click on the tab (left panel) with your school’s name

2. Select the tab on the left that says Access.

3.
This allows you to adjust whether you want users with Supervisor access to view students that are from other departments, schools, or under the supervision of another teacher/coordinator.

4.
This allows you to adjust whether users can view fields such as ‘date of birth’.

5.
Here you can adjust whether you would like to receive notifications regarding student scheduling.

Adjusting the progress bar

Q. How do Teachers/Coordinators update the progress bar for an individual student?

1. Click on the  tab

2. Locate and click on the student that you would like to adjust progress bar hours for – this will take you directly to the student’s Hour section.

3. Click on the gear  icon under the progress bar (right-side of the page)

4. Now you can adjust the progress bar hours for each Hour Type such as Placement/Co-op and Volunteer hours

5. Click  to save any changes

NOTE:

  • Any changes made to an individual student’s minimum hours will differ from the default minimum hours set for the school.
  • Students can also update their progress bar by following the same steps.

Q. How do Teachers/Coordinators update the progress bar settings for their school?

You can set the progress bar hours for your school. This gets triggered for new student registrations but does not overwrite the progress bar settings for students who have already registered.

1. Click on the tab (left panel) with your school’s name

2. Select the tab on the left that says Progress Bar

3. Once on the Progress Bar page, you can adjust the minimum hours needed for different hour types such as Volunteer, Placement / Co-op, and Extracurricular hours, by typing in the desired number.


4. Once you’re finished adjusting the minimum hours, click 

Q. How do I Use the Progress Bar?

1. Progress bars for individual students can be viewed in the Hours section of the student profile.

Students can adjust their individual progress bar settings by clicking the gear icon below their progress bar.

2. The progress bar displays the total number of hours a student has including their Rejected, Verified, Pending and Draft hours. There are 5 colours used for the progress bar:

Red = Number of Rejected Hours

Dark Grey = Number of Draft Hours

Orange = Number of Pending Hours

Green = Number of Verified Hours

Light Gray = Number of Hours that have yet to be completed


How do I join a webinar?

If you would like to join one of our webinars and learn more about the webinar software we use, please follow these steps:

A. How do I sign up for a webinar?

1. Click here to view our webinar schedule.

2. To join a webinar, please email us and share the following details:
= The date and time that you are available
– The software that you would like a demo of:

Placement / Co-op Tracking
Form Developent (e.g. Work Education Agreements)
Volunteer Hour & Activity Tracking
Faith-Based Hour & Activity Tracking
Extracurricular Hour & Activity Tracking
Certification Tracking
Employer Database

NOTE: Our webinars are live and run for approximately 30 minutes. We answer all of your questions and help you get set up with Hour Republic.

B. In which format are the webinar details shared?

Once we have scheduled you for a webinar, you will receive an email prior to the webinar with of all of the relevant details. For example, the email will appear as follows:

Please join my meeting from your computer, tablet or smartphone.
https://global.gotomeeting.com/join/123456

You can also dial in using your phone.
Canada: +1 (647) 555-5555

Access Code: 123-123-123

New to GoToMeeting? Get the app now and be ready when your first meeting starts:
https://global.gotomeeting.com/install/123456

C. How do I join the webinar?

1. Click on the “Please join my meeting” link

2. When you click on the link, you will get the option to:
(i)  Click Join on the Web button to run the software in your current web-browser (does not require downloading GoToMeeting)
OR
(ii)  Click Download the App (this step is not required)

3. Once you click one of these options, you will be taken to a page where you can turn your microphone and camera on or off by toggling the corresponding icon. You are not currently in the webinar so you can take your time setting this up.

4. Once you’re content with the settings (tips below), click the  button to join the webinar.

SETTING TIPS

You can also change your username by clicking the  icon next to your name

If you’re not sure your microphone is working, you can click the  icon in the top right corner to open up the Settings.

Once you’re on the Settings page, you can test your microphone and the speakers by toggling the icons next to the appropriate field. You can also opt to call-in by clicking on the Phone tab.

Ready to leave the call? Click the Leave Meeting button at the bottom of your screen.

ICON GUIDE

10. During the webinar, there will be a series of icons in the top right that you can access. The icons are as follows:


Lets you know how many people are in the meeting as well as their usernames.


If your microphone is turned off or if your audio is not working, then the Chat
feature is a great way for you to type any questions you have to the presenter.


If there are any issues with the sound quality of the presenter or your
microphone, then check the Settings to fix any audio problems.


Would you like to discuss your experience with GoToMeeting? Or perhaps change to Fullscreen mode? Have audio issues that can’t be fixed in the Settings? If any of these questions apply to you, then click on the Miscellaneous icon.


How do I Assign an Organization/Employer to a Student?

Option I – Students Tab

Students normally pick or add new organizations / employers when they add hours for the first time. It’s normally easier that way and less work for teachers / coordinators. However, if you want to do the initial leg work, you can.

NOTE: Organizations / Employers added by students via the Hours section are automatically set to Pending. Teachers / Coordinators can update the status of organizations / employers to Active if they wish.

NOTE: Students do not have access to the Organizations / Employers section which houses the detailed database. However, students can search the database or add new organizations / employers (name of organization / employer, positions and contacts) via the Hour section.

1. Click on the Students tab (left panel).

2. Search and click on the desired student; this will automatically take you to their Hour page.

3. Click on in the top-right corner.

4. Type in the name of the organization / employer (e.g. Food Bank) to search the database. Or, next to the Organization field, you will see a  icon. Click on it to assign and add a new organization / employer to the student.

5. Fill in all the necessary information regarding the organization / employer.

6. if you wish, continue to fill out the information for the hours such as Skills Learned and Description, then select one of several Save options.

Option II – Organizations / Employers Tab

You may want to pre-populate the student employers before students add hours for the first time. If so, follow the instructions below.

1. Click on the Organizations/Employers tab (left panel)

2. Click the  in the top-right corner to create a new organization / employer. Or, click on an existing organization / employer to add or edit information.

3. Fill in all of the necessary information regarding the organization / employer. Key sections to complete and support the student, include:

  • Contacts (First Name, Last Name, Email)
  • Position (the job title of the student)

4. Once you finish creating the new organization / employer, click 

5. Now go to the Students tab, and complete the steps in Option 1 above.


How do I add Bulk Achievements?

Bulk Achievements are a fast and easy way to designate achievements (e.g. Safety Training, First Aid) to large groups of students. If you would like to learn how to do this, then please follow the following steps:

1. Locate the sidebar to the left panel, then click on the tab with your school’s name.

2. There are a series of icons at the top of this section, and at the far-right, you will find the Bulk Achievements icon. Click on the icon: .

4. Create a new bulk achievement by clicking onin the top-right corner.

5. This will take you to the General tab where you fill out information such as the Type, Completion Date, and a short Description of the achievement.

6. Indicate which students received the achievement by clicking the Students field at the bottom.

7. Check the box next to the name of students who received the achievement.

8. Once you’re finished selecting the students, click  at the bottom-right corner of the menu.

9. If you know who issued the achievement, click the Issuer tab (left-side). You can fill in information regarding the the Name and Contact Information of the issuer.

10. Have an image file or document to go along with the achievement? Click on the Attachment tab then select  to upload your file.

11. Once you’re finished setting up the bulk achievement, click in the top right corner.

NOTE:

If a group of students received an achievement and it’s already listed on the Bulk Achievement page, you can click on the desired achievement, check off the names of the new students then click . This keeps the Bulk Achievement page organized and free of duplicate achievements.

Hour Republic FAQs Guide

Look no further than this guide to direct you to the FAQ you need

General
•    Getting Started Guide
•    How do Teachers/Coordinators sign-up via hourrepublic.com? (or, Google sign up)
•    How do I reset my password and find my username?
•    General Questions
•    How do I send a message to an individual, group, or a class?
•    Pre-placement Activities
•   How do I Locate Unapproved Hours?

Main Administrator Section
•    How do I create a new class and signup code? 
•    How do I add a new resource?
•    How do I add Bulk Achievements?
•    Adjusting the progress bar
•    Disable/hide certain sections and fields
•    How do I add or change my school’s logo?
•    Student Types
•    How do teachers/coordinators customize the Achievements drop-down?
•    A Student is Missing from my Class (Hour Tracking)
•    Why can’t I see students on my Students section?

Employer/Organization
•    How do I add new Organizations/Employers?  
•    How do I add contacts to an Organization/Employer?  
•    How do I add a Volunteer or Placement opportunity?
•    How do Organizations Approve Hours?
•    Published and Public Positions/Opportunities
•    Active vs Pending Organizations/Employers
•    Why isn’t an organization receiving my email to verify hours?
•    How do I add employer expectations?

Students
•   
How do students sign-up via hourrepublic.com? (or, Google sign up)
•    How do I add Volunteer and Other Hours?
•    How do I add Placement/Co-op Hours?
•    How do I print a report of my hours?
•    How do I manage my Student Dashboard?
•    Icon Guide
•    How do I Assign an Organization to a Student?
•    How do I see when students registered or logged in last?
•    How does a Student Add More than One Shift?
•    What if a Student has Two Employers/Supervisors?
•    How do Students and Teachers/Coordinators Create an Achievement?
•    How do I Track Overnight Shifts?

Reflections/Journals
•    How do teachers add new Reflection/Journal topics? 
•    How do students submit a Reflection/Journal?
•    How do teachers mark Reflections/Journal topics?
•    How do students delete a Reflection/Journal?

Reports
•    How do I generate a report? 
•    How do I generate a PDF version of reports?
•    How do I print a report of my hours?

Calendar
•    Colour Coding in the Schedule
•    Navigating the Calendar
•    How do I create a PDF Version of the Calendar?

Navigating the Calendar

A. How do I set up an Event?

1. On the sidebar, click the Calendar tab.

2. Once you’re on the Calendar page, click on the  symbol in the top right corner.

3. Create an event by filling in the necessary fields (required fields have an asterisk (*).

4. Once you fill in the necessary fields, you can choose to select the Class that has access to this event, invite specific students and write a short description.

5. Select the Recurring tab to decide if you would like this event to occur over a certain time interval and what days you would like it to occur.

6. Click Save.

A. How do I Invite Specific Students?

1. When you’re creating an Event, you have the option to invite specific students by clicking on the Students field.

2. Select the students you would like to invite by checking off the box next to their names.

3. If you have a specific group of students in mind, you can filter students by Status, Role, Semester, and Class.

4. Once you have chosen your students, click .

NOTE:

1. You can check off the box next to the Student column to select all members of your school or program.

A. How do I Edit Events?

1. In the calendar view, click on the event that you would like to edit.

2. Now you can edit information regarding the event such as the name, contact, start and end time, etc.

3. If you invited students to the event, you can check the status of their invite by clicking on this icon: 

4. If the invite is still pending, you can choose to  the invitation or you can manually accept the invite by selecting the student’s name

5. Once you select the student’s name, you can click the status field to edit their status.

6. You can also remove the student from the event by selecting .

6. Click Save to maintain any changes.

NOTE:

1. You can click on Today to go to the current date and click the left and right arrows to move between months

2. Selecting Day, Week, or Month will organize the Calendar accordingly.

A. How do I filter Events?

1. There are multiple ways you can filter events. When you’re on the Calendar page, you can find the filters at the top left of the page.

2. If you know the name of the event of interest, you can type it into the Search Bar.

3. You can filter events depending on if students are needed or if you’re invited to the event by selecting the filter to the right of the search bar.

4. You can also filter events by Class by selecting the filter to the left of .

5. Once you’re content with the filters, select  to apply the filters.

TIP

For more details on calendar colour coding, please click here.

Colour Coding in the Schedule

Q. What do the Different Colours mean for Teachers/Coordinators?

Gray signifies that no students have been invited to participate in the event.

Dark Gray signifies that students have been invited to participate in the event, however, none have accepted the offer yet.

Orange signifies that the shift is partially filled. Some of the invited students have accepted to participate in the event.

Green signifies that all invited students have accepted to participate in the event.

Q. What do the Different Colours mean for Students?

Gray signifies an event has been scheduled.

Green signifies that the student has accepted to participate in the event.

How do students delete a reflection?

In need of deleting one your reflections? Then follow these steps:

  1. Go to your Reflections / Journal Topics tab and click on the reflection you would like to delete

2. Next, click the Delete button

3. Once you click this, you will get a prompt to confirm your decision. Select OK to permanently delete your reflection

NOTE: These steps apply to deleting hours, achievements, notes, check-ins and attachments as well. For example, you can visit your Hours page, click on the hours you would like to delete, then select the Delete button to permanently remove them.